Tuesday, October 29, 2013

Holiday Gifts Under $5

decorated cardboard and sweets

Reuse cardboard drink carriers and empty bottles to make a cute gift for sweet and salty treats


starbucks
Ask The Barista for a clean cup and lid. Stuff with brown and white tissue. Slide Starbucks gift card inside


cookie recipe


Wrap frozen homemade cookie dough in parchment, print out recipe on white paper, and wrap


jar of nothing

Did you say nothing? When you were asked what you wanted for Birthday, Anniversary, Graduation or Christmas. Don't you remember saying NOTHING Well this time someone heard you, searched high and low and found this perfect gift for you.


Buy a couple really of pretty bars of  soap it's so pretty you won't need  gift wrap


Make Magnets from Bottled Starbucks Frappuccino


herb pots
Pick up a couple packets of seeds that are suitable for a windowsill garden – chives, cilantro or basil, perhaps – some small pots and soil for an inexpensive gift that will keep giving all year.


Give the gift of snuggly warmth in the form of a nice, thick pair of socks. For the best deal, buy a multi-pack; and divide it among several people on your gift list.


Most grocery stores – and many big-box stores – now sell reusable shopping bags for 99-cents a bag. Pick up five of them for the perfect eco-chic gift. Or put your gift inside for a bag they won't have to throw away.

recipe in a jar


Put ingredients for a recipe in a Decorative Jar.


Monday, October 28, 2013

Tonight's Blog is a Poll

We want to know what you want!

Please take a moment just to check a box and let us know, we value your feedback.
Junkin4Humanity wants to know what you would like to see in our blog for the upcoming holiday season?
  
pollcode.com free polls 

Sunday, October 27, 2013

Salt Dough Ornaments For The Holidays

Spending Quality Time With Family

Whether money is tight during the holidays or you just want a new craft to do with your kids? Salt Dough Ornaments are the best thing to do either. Made from things you already have in your cabinet, you can make special keepsakes with this recipe from Halloween pumpkins, to thanksgiving decorations and even Christmas ornaments.  Nothing is more special than making a homemade memories, spending time with your family and keeping your keepsakes for years to come.


 Directions for Salt Dough Recipe

Ingredients 3/4 Cup of Shortening 3/4 Cup of Sugar 1/4 Cup of Brown Sugar 1/2 Cup of Molasses 3 Cups of Flour 1 TBSP Cinnamon 1/2 TSP Salt 1/2 Cup to 1 Cup of Water (more or less) Directions Cream together the Shortening and the Sugars in a large mixing bowl until mixed well. Stir in the Molasses, again until mixed well. In separate bowl, combine the Flour, Cinnamon, and Salt and stir to combine. Begin to alternately add your dry ingredients to the wet mixture. Add the flour mixture and 1/4 cup of the water at a time until ingredients are mixed and you have formed a good dough. At some point, it's best to just get your hands in there and start mixing, as it will quickly become a challenge to stir with a spoon! You may need to add a little more water or flour to get your dough to the correct consistency. You want to be able to touch the dough with your finger and have it not stick to it. So when that happens, it's ready. Shape your dough into a large ball. Cover it with plastic wrap and set in the refrigerator for 20-30 minutes. If you plan to be using your dough for cut-out ornies (using cookie cutters, etc), what I like to do is sprinkle my counter with cinnamon. This helps the dough to not stick, but it also adds extra cinnamon to the outer layer of the dough, which I like. But this is totally optional. I also suggest you buy your cinnamon in large bulk containers; it's much cheaper that way...and get the cheapest cinnamon you can find. No sense spending a lot of money on something you aren't going to eat! For cut-outs and small ornies (like the cinnamon bun ornies), bake these at 350° for for 15-20 minutes. It may be more or less, depending on your own oven. They will harden quite a bit while cooling. Just be sure they're cooked through and let them cool completely. For larger items like pantry cakes or very large cinnamon buns (I've done full size ones on occasion), I usually bake them at 325° for 20-30 minutes, again, oven times will vary, and the thickness of your item will be a big factor too. And if you're going to dip your ornies or other baked dough items in wax, just make sure they are cooled completely before doing so.

Saturday, October 26, 2013

Primitive Wreath Made from old Maps

The primitive look is quite the rage for many crafters as well as home decorators. It is not just a fad, its a way of life. It is a decorating style that is simplistic, giving a feeling of warmth to a home. I love it because, it is a way to come in from the world into your own private space that quietly whispers a "welcome home" and tranquility to it.

One of my favorite things is old maps, atlases and globes. I always snatch them up when I'm thrift shopping. Since I had so many on hand, I thought I would make a wreath from them.


I got this wreath for .69


Removed the flowers


I then took an old book filled with maps I got for .25 and cut the maps into leaf shapes.
Then measured them out by laying them around the wreath. These leaves I wanted to fit the contour of the wreath itself. I then took the map leaves and soaked them in coffee to give more of a vintage look. Then laid them on the wreath to dry and fit to the contour of the wreath.


For the map leaves that would be stemming from the wreath, I also soaked them in the 
coffee mixture. Then laid them out in an egg carton to allow them to dry to a wrinkled look.


After they were dry, I alternated them with the ones I allowed to dry on the wreath and hot glued them.


I then added ribbon to the wreath. This one I made a rose out of the 
ribbon and hot glued it to the wreath to stay in place. If you need 
help on making a ribbon rose Factory Direct Craft has a good illustration.


  • wreath                    $  .49
  • ribbon                     $1.97
  • Old Atlas Book         $ .25
  • --------------------------------------------
Total Of Today's Project   $2. 71


Friday, October 25, 2013

Remodeling The Den

Today I started in the Den, It is the darkest room in the house, having one entire end of the room with a built in cabinet. Nothing but paneling in the house. Paneling has to be the biggest mistake of the 1960's. Something that was once popular will, if given enough time, almost always circles back into popularity again. I'm not talking about full length solid wood paneling, that is a different story. But the veneer paneling... that should have stayed gone. Instead it has found its way back to becoming popular. I am going to pass up that train and go with something else.


As you can see my camera can't even take a good picture because of the darkness of the room.


And to make things worse...the same green paint theme continued from the kitchen.


So my first project is to paint the built in. I wanted to start there because even though its causing a lot of darkness, it still is a focal point in the room.


I used the dark paneling in a positive way by painting my new color over it and allowing the dark brown to show through. Taking a dry brush and wiping back off the wet paint to make it look distressed.  
I wanted the built in to look more like a piece of furniture than just a built in. 
You can already see how much it brightened up.


I then changed the hardware to some vintage pieces.


Then painted the remaining walls a light beige to compliment


Added Thrift Store Valance $2.00


And painted the trim white.

  • Paint (dent sale)                             $5.00
  • Paint for built in  (mismatched)        $5.00
  • Thrift Store Valance                       $2.00
  • --------------------------------------------
Total Of Today's Project                         $12.00


Thursday, October 24, 2013

Kitchen Remodeling Project Day 2 by Junkin4Humanity

Kitchen Remodeling Project Day 2

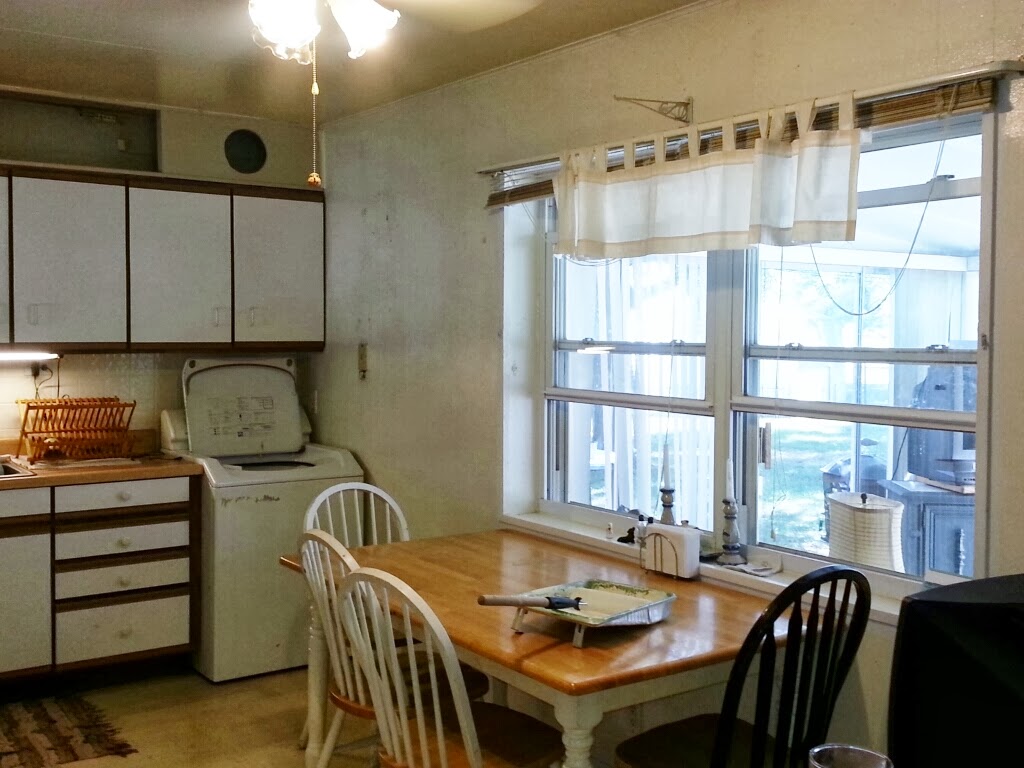
Tonight I want to finish up our kitchen project. Yesterday we got the wallpaper hung. Although, I never thought I would ever hang wallpaper again. Today I started painting the walls a lighter color over top of the light green walls. Don't get me wrong, I love the color of green, but this color had to been given to the person who painted this room. No one would have bought this on purpose, mismatched paint or not. I went with a white with beige undertones on the wall and it's amazing how much it brightened the room. 

Kitchen Before

On the other wall I needed to take care of the 2 holes that were hidden behind a unsightly curtain and paint the wall as well. I opted for a contrasting color above the uppers that complimented the wallpaper.

Kitchen After

As far as the holes, I decided to go with a handmade creation. I found 2 mirrors (.99) in my "shed stash" along with some silver forks (bag for $1.00) I had. I flattened the forks out and bent the tines and hot glued them to the glass.

Mirror Art

I then took a board that originally came from a dresser drawer bottom (donated). It was an antique newspaper that had been pressed onto the board years ago. I then placed the mirrors on top, measured my wall openings and cut to fit.

Wooden Dresser Board

The plaques were hung over the holes and I also added chicken wire and a chalkboard sign (leftover from previous projects). I love to be able to change the bible verses their each day. It also helps us to learn them as well.


On this wall I took a old rod iron plate holder ($2.50) and painted it to go with my "metalware" look. I love all the old tins and brasses.


The curtain ($2.00) I searched high and low for at the thrift stores. I needed something with the colors of all the metalware that I had. This was the closest thing I could find but unfortunately was a panel, not a valance. I hate to sew so I took burlap (roll $3.00) and drew them up to make it more aesthetic. Then hot glued old vintage hardware (shed stash)  to the burlap.

Upcycled Window Panel


Before and After's


Before and After Kitchen

Before and After Kitchen

Before and After Kitchen

.99 cent Thrift Store Canoe Picture

.99 cent Thrift Store Canoe Picture

Miscellaneous Metalware (.49-2.00)

  Miscellaneous Metalware (.49-2.00)


Starting on the Den Tomorrow's Blog!


  • 2 mirrors                                                         $  .99
  • silver forks (bag for $1.00)                           $1.00
  • dresser drawer bottom (donated)                $  .00
  •  chalkboard sign (leftover from projects)     $  .00
  • old rod iron plate holder                                $2.50
  • burlap (roll)                                                     $3.00
  • Thrift Store Canoe Picture                           $ .99
  • Miscellaneous Metalware (.49-2.00)          $6.00
  • ------------------------------------------------------------------------------------------------------
  • TOTAL OF TODAY’S PROJECT              $14.48


Wednesday, October 23, 2013

Kitchen Remodeling Project By Junkin4Humanity

As I had mentioned in previous posts, I have been redecorating my home room by room with my thrift store finds. Decorating is not only fun, but the satisfaction of how much money you can save doing it through thrift store finds is incredible. Where else can you spend little money, have it look exactly how you want and your husband not be mad at you. By the way, the perfect time to go is while he's watching football on Sundays, he'll never know you've left the house!

Kitchen Makeover Before

When I met my fiance, his theme was the "divorced-my-brother-gave-it-to-me" look. I'm not saying he didn't give it a good try, but there was some finishing up that needed to be done....extensively. Over the next couple of weeks I will take you through my journey as this house becomes a home. 

First, in the kitchen were blinds, green walls, and white cabinets.


Here you see the 2 holes that used to be covered up by a very bad "curtain". Not sure what it use to be, but I knew it needed some work.


Here you can really see the green paint!


 Yep, Thats John!...the green paint and old wallpaper.


 green paint and leftover wallpaper...Nice...Not.


Another Bad Angle (They are all bad though on this wall)


Kitchen Makeover After


Here is my 3 rolls of wallpaper for .99 cents. Although I swore never to wallpaper, the incredible deal made it look even better. It also gave me a good look for a contrast wall that I love to do in each room.


On this wall I painted the upper above the cabinets a contrasting color to the wallpaper.


Then a beige color for the walls.

Finishing up the Kitchen on Tomorrow's Blog!


  • paint for kitchen walls              $16.99
  • Contrast color above sink          $ 4.99
  • ------------------------------------------------------------------------------------------------------
  • TOTAL OF TODAY’S PROJECT      $21.98