Showing posts with label distressed furniture. Show all posts

Saturday, November 2, 2013

Creative Chalkboard For The Holidays

Here is a cute idea for a gift for the person who loves shabby chic, or just likes to stay organized. Instead of buying that expensive chalkboard or the even more, expensive chalkboard that you find at your neighborhood craft store, why not make one? 
I found this cute wood display at the thrift store and loved its "bones", so I decided I would make it into a chalkboard that I have been meaning to make for my kitchen.


What a deal .09!!


Directions

  1. I started out by sanding it down first.
  2. Then painted it with a black spray paint to give it some aesthetic texture for the final result. 
  3. After drying I painted it with a white wash; 2 parts paint with 1 part water.
  4. Removed the backboard and painted with chalkboard paint.
  5. While chalkboard is drying, I sanded the white frame for a distressed look and then applied liquid black antiquing. (remember a little goes a long way of this stuff.)
  6. I then reapplied the chalkboard to the back of the frame.
  7. Add any type of hardware, design, or stenciling.
  8. Where the gap was, I added a piece of brass that use to be on an old vintage window and cut to fit. Giving it more flair as well as covering the gap.
There you have it!! A Custom Made Chalkboard for a fraction of store prices. Even if you were to give as a gift, no one will ever know that you spent next to nothing. All they will see is all the love that went into a custom gift just for them.

After I made this, the next morning my wonderful guy left me my first note to wake up to. He really is the best!


  • Thrift Store Wood Display                       $.09
  • Chalkboard and Paint (on hand)               $.00

------------------------------------------------------------------------------------------------------------------

  • TOTAL OF TODAY’S PROJECT                   $.09


Sunday, October 20, 2013

Dressed Up Dresser Upcycling Thrift Store Furniture

Thrift Store Dresser Before and AfterNothing is more fun than fixing up an underdog, they are always my favorite. Finding that ugly piece of furniture is like that sad faced overlooked puppy at the pet store. It may be ugly, but underneath is the same skin and bones.

I found this small dresser and it looked like it used to belong in a child's bedroom. Spiderman stickers, gum, and well...lets just stop there. I knew it needed saved and I was the one that would do it! Of course there was prettier dressers, even for a thrift store, but this dresser kept tugging at my "underdog heart strings".

Thrift Store Dresser

First make sure that you remove all paint, stickers, gum etc. Especially the loose paint like this one had. It had spray paint over the base paint. I do believe spray paint has a purpose on base wood at times, but not visa versa. It just doesn't stick well over latex.

I even left some of the base paint on because it allows a "bleed" through with the top layer of paint after sanding. As you can see I even left the colors just the way they were as well.

Thrift Store Dresser


After the sanding is complete. Choose your paint color. I am using some surplus mismatched mismatched-paint (basically mismatched paint from Lowe's I remixed with other mismatched paint). Since I have such a surplus and it doesn't like the cold weather that's headed our way I chose this color. So this way, I don't have to drag as many paint buckets back into the house over winter.

Mismatched Paint

Then to add interest and more "bleeding"  I poured a small amount of a darker blue into the paint WITHOUT mixing. Jut leave it in a swirl pattern. When ready to paint dip your brush straight up and down into the paint to keep the swirled paint on your brush just like it is. Then apply to your project thin coats at a time allowing each layer to dry before adding the next.

While waiting on the paint to dry, this gives you time to take care of the hardware that was on your project. The knobs I had were white and I opted for a nickel color instead. So I spray painted these with a can of Dupont Spray paint in nickel.

Thrift Store Dresser Hardware


After all paint has been applied to your taste, then take a sander with small grit sandpaper and just add your distressing to it. If you are not into the "distressed" look, then leave as is. You now have a custom styled dresser you can proudly display. No one will ever believe it was that sad puppy in the store!

Upcycled Thrift Store Dresser


  • Paint onhand                                    $.00
  • dresser (thrift store)                          $.09
  • included                                           $.00

----------------------------------------------------------------------

TOTAL OF TODAY’S PROJECT     $.09


Wednesday, October 16, 2013

What To Do With Leftover Paint

My daughter came up to see me last week and we had a field day running to thrift stores and antique malls. I never realized I lived within minutes of the top 5 places in Ohio to do either one. That just made my day. Some of my daughters dabbled in a project here or there, but never seemed to take off with it like I have...I think the word is "addiction", so its probably just as well. But this day was different and I wanted to share with you what just a few hours and some leftover paint can do for a thrift store find of a chair and basket. We first found this chair and even though it needed some updating, it had good bones.


I let my daughter dig through some of my mismatched paint that was mixed with other mis matched paint and she began to paint away. It was so much fun doing something with her that I love so much! She decided on a blue and green paint that I had mixed together and had it and painted and distressed it within the hour.


We then took a basket which we also got that day and just dry brushed white paint randomly to match it up with the chair for a corner she wanted in her house.


The last thing she bought was a carpenter box at the antique mall. To some it may have just been a boring box, but to us it was a palette. 


She decided on white paint and we picked out hardware from my boxes of treasures and applied them.

`
Not only is shopping for treasures fun, but upcycling them and staging them are as well. Within no time she had a couple of new items to decorate her home with in just a short time.


  • Thrift Store Chair                  $   .99
  • Spray Paint (on hand  )          $   .00
  • Project Paint (on hand)          $   .00
  • basket (thriftstore)                $   .99
  • Carpenter Box                       $10.00

--------------------------------------------------------------------------------------------

  • TOTAL OF TODAY’S PROJECT    $11.98


Monday, October 14, 2013

Uptown Farm Table

Nothing is more important than the dining room table. It is a place that we are supposed to come together, communicate, share and listen.

 Here are some dinner statistics to chew on:
  • Children not eating dinner with their families are 61 percent more likely to use alcohol, tobacco, or illegal drugs;
  • Children who eat dinner with their families nightly are 20 percent less likely to drink, smoke, or use illegal drugs;
  • Teens who share frequent family dinners are less likely to have sex at young ages, participate in fights, or be suspended from school;
  • Teens who eat dinner with their families are at lower risk for thoughts of suicide;
  • Children who eat with their families are more likely to eat healthier foods and more balanced meals; and
  • Family dining improves communication and family connections.
So even though my blog is not about statistics, it is astounding that the table is more than just important. But, the dining room table doesn't have to be expensive to achieve the above results.

Our furniture is an expression of our family. There is so many different types of looks and decor and for each family it is different. I want to share with you a table that I found at the local thrift store and refurbished for my daughter. It just goes to show you, a lot of cash doesn't have to be spent to get the look that your family desires.

I will never understand why anyone would give up a solid wood piece of furniture. Yes, its definitely seen better days, but there is a beautiful surface under those years of abuse. So I guess I am thankful to those who don't choose to redo their wood treasures, or I wouldn't have anything to blog about. 


I basically started with alot of sanding. The tabletop did not take too long and the legs thankfully had not much lacquer still remaining. Even so, I took  a shortcut to sanding and spray painted the legs with basic white spray paint. The spray paint seems to stick easier to the lacquer and  the latex paint adheres to the spray paint very well.


The chairs were leftover from my next door neighbor's yard sale. She had them stored in the garage for years. They are solid early 1950's chairs that like the table, were stored and just forgotten about. 


As sometimes I do when I am so into a project I did not take pictures of every step. But here is one I took only minutes after sanding the tabletop. Within a few minutes you begin to see the raw wood that is just waiting to come out.

After much deliberation with a another daughter, who always helps me out on paint choices. We searched the internet for the right color's and decided on a nice "green distressed" farm table with black accent to set it off. We then added a provincial stain to keep it authentic to a Farm Style Table.


We then painted the chairs with the same black accent. This allowed the dark maple color on the back of the chairs to stay their original color and give them a nice contrast with the table.  

All in all, this was a  a large project that I enjoyed seeing the final result. It's also very satisfying knowing that while my daughter and her family sit at their custom made table that I had a hand in, they can share their day as they come together and I can somehow be part of that. 

  • Thrift Store Table                     $11.00
  • Spray Paint (dollar store)            $1.00
  • Project Paint (on hand)                  .00
  • 4 Chairs (leftover yardsale)            .00

--------------------------------------------------------------------------------------------

  • TOTAL OF TODAY’S PROJECT     $12.00

Wednesday, October 9, 2013

Queen Size Headboard Turned Into A Coat Rack

Yesterday while shopping at the thrift store with my daughter we came across this wonderful Queen headboard. I loved the color as well as the style. I knew that with railings gone that most people would just pass it by, but still I took no chances and snatched it up. I had no idea what I was going to do with it, but how could I pass it up for .09 cents.


When we got it home, I started digging through my covenanted boxes of old hardware and then I knew...Coat Rack.

I started out by taking off the legs first. Next I distressed it with a hand sander, then added hardware. Last step I took some antiquing paint and brushed it over the areas I had distressed.

Not too bad for a hour's work for the finished product. A new coat rack for about .25 cents.


  • Paint (onhand)                        $.00
  • Headboard from thrift store      $.09
  • Hardware (3 x $1.00 yard sale)  $3.00

--------------------------------------------------------------------------------------

  • TOTAL OF TODAY’S PROJECT    $3.09 


Saturday, October 5, 2013

TV Console Turned Hutch For $10.00

TV Console Turned Hutch For $10.00

I thought I would share a find that I have upcycled lately. It was a Made in Italy by Ballard Designs Console. I picked it up at the local thrift store for 8.00. I decided that I wanted it much higher than the 2 inch ball legs that were on it. I wanted to turn it into a hutch that I could utilize more than as a TV stand.

Image 

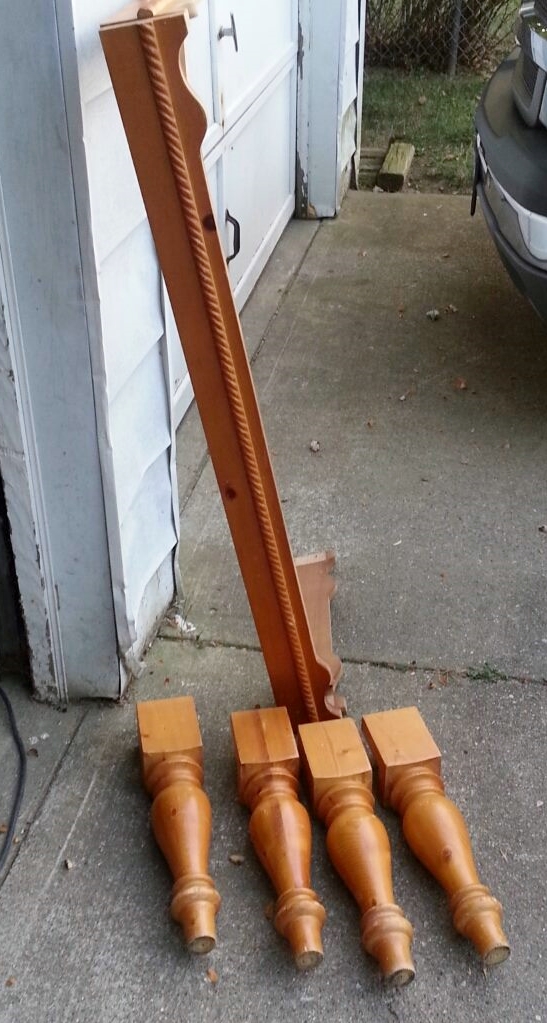
 I had a coffee table that I made the top of this bench seat from. What remained were 4 legs and the decorative edge from the coffee table.


  Image Image

Upon measuring the decorative edge from the coffee table it was almost a perfect fit.

Image 

I then applied the decorative edge, along with the legs from the leftover coffee table and it worked out better than I thought. I used the same hardware as well and screwed everything into place.

Image 
After applying all of my pieces, I repainted it and gave it a shabby look. I can't believe I found a console made in Italy by Ballard Designs that normally sells for $600.00. I paid 8.00 for the console and the left over pieces of a $2.00 coffee table.

.

  • Thrift Store Console by Ballard Designs   8.00
  • Paint from previous projects                     free
  • Wood legs and decorative wood              2.00

--------------------------------------

  •  TOTAL OF TODAY’S PROJECT     $10.00
Upcycled Ballard Designs Console