Showing posts with label upcycled furniture. Show all posts

Friday, October 18, 2013

Making it in Rough Economic Times with Thrift Store Finds

Thrift stores, they're so much more than inexpensive places to shop. They're treasure chests filled with the kind of unique items that can make you and your home look terrific for a fraction of the cost of regular stores.

 This blog is to give you a hand on what thrift stores can be for you and your wallet. I hear some people say there isn't anything they see in thrift stores that they need, they have an aversion to dirt, no patience, or just bad luck. Well maybe you aren't looking with the right frame of mind. The truth is that anyone can be a good thrifter if they keep an open mind. It's as simple as recognizing when an object needs a good cleaning, a coat of paint, or even just a new context.

 With today's economy hunting for an item that you need can be a family event. For example: shopping for a coffee table could be a form of entertainment with your family. Find a large box and by refinishing it or painting it, you have a coffee table that can be a work of art and a conversation piece and family time spent together. Not to mention the money you save and you end up with something that defines who you are, more than a coffee table that a manufacturer thinks is your style.

 Dishes: You can find mismatched dishes in a range of colors and patterns at any thrift shop. Use them to build a collection, hang a wall of plates, or make them into mirrors.


Artwork: If you're thinking of hanging a wall of clustered artwork, thrift shops are a great place to build a cheap, out-of-the-ordinary collection.


Shelves and Secretaries: Storage pieces are always useful around the house. Clean up shelves with paint or wallpaper. Although old-fashioned, secretaries are really useful pieces that can easily transform into a home office, bar, or linen closet.


Sweaters and Blankets: Have these dry-cleaned, and then use them to add some coziness to your home by reupholstering it or covering a footstool.


Trunks, Suitcases, and File Cabinets: Industrial trunks and storage pieces or vintage suitcases are easy to find at flea markets and thrift shops. Clean them up and use them as occasional tables.


Dining Chairs: Whether you're looking for a whole set or a single side chair, dining chairs are always waiting to be scooped up at second-hand shops. If your chair needs a little love, try painting it, reupholstering a seat, or staining it.

Dining Tables: Simple thrift store tables can be used for kitchens, dining rooms, or repurposed as a desk. If the table is scuffed or needs some DIY love, try restyling it with paint, fabric, or even just a tablecloth.


Lamps: Sometimes all a lamp needs is a new shade and a good cleaning to make it brand new. If you find a broken lamp at a thrift store, you can always try rewiring it.


Rocking Chairs: Rockers are great for a child's room, a porch, or even a corner that needs a big piece. If your chair is a little dull, try painting it.


Fabric: If you've got basic sewing skills, thrift stores are the perfect place to look for fabric scraps to use for pillows, napkins, tablecloths, curtains, and any other project that could use a stash of mismatched prints. Just make sure to wash your fabrics before using them.


Tip- Abandon any preconceptions you might have about thrift stores. Today's thrift stores aren't unclean low-end shops. Thrift stores vary by chain and by store. But while many people may think of them as being scary places of questionable quality and safety, many stores are bright, clean and extremely professional. 

Here are some popular misconceptions I've heard:
"Thrift stores are only for people of low income": Not true! Thrift stores are for anyone who is willing to look for a bargain.

 "Pre-used things are not sanitary-- I only buy new.": Most thrift store items are easily cleaned. And think of it this way-- when you go to a restaurant or a hotel, you are eating off dishes and cloth napkins, and sleeping on sheets, with likely more people pre-using them than you ever would at a thrift store. So shed any fears about thrifting and go for it!

By shopping often, you have a better chance of finding the items everyone snaps up right away, as well as, parts to sets of things, like specific china patterns, collectibles, etc.

--------------------------------------------------------------------------------------------

  • TOTAL OF TODAY’S PROJECT      Priceless!


Wednesday, October 16, 2013

What To Do With Leftover Paint

My daughter came up to see me last week and we had a field day running to thrift stores and antique malls. I never realized I lived within minutes of the top 5 places in Ohio to do either one. That just made my day. Some of my daughters dabbled in a project here or there, but never seemed to take off with it like I have...I think the word is "addiction", so its probably just as well. But this day was different and I wanted to share with you what just a few hours and some leftover paint can do for a thrift store find of a chair and basket. We first found this chair and even though it needed some updating, it had good bones.


I let my daughter dig through some of my mismatched paint that was mixed with other mis matched paint and she began to paint away. It was so much fun doing something with her that I love so much! She decided on a blue and green paint that I had mixed together and had it and painted and distressed it within the hour.


We then took a basket which we also got that day and just dry brushed white paint randomly to match it up with the chair for a corner she wanted in her house.


The last thing she bought was a carpenter box at the antique mall. To some it may have just been a boring box, but to us it was a palette. 


She decided on white paint and we picked out hardware from my boxes of treasures and applied them.

`
Not only is shopping for treasures fun, but upcycling them and staging them are as well. Within no time she had a couple of new items to decorate her home with in just a short time.


  • Thrift Store Chair                  $   .99
  • Spray Paint (on hand  )          $   .00
  • Project Paint (on hand)          $   .00
  • basket (thriftstore)                $   .99
  • Carpenter Box                       $10.00

--------------------------------------------------------------------------------------------

  • TOTAL OF TODAY’S PROJECT    $11.98


Monday, October 14, 2013

Uptown Farm Table

Nothing is more important than the dining room table. It is a place that we are supposed to come together, communicate, share and listen.

 Here are some dinner statistics to chew on:
  • Children not eating dinner with their families are 61 percent more likely to use alcohol, tobacco, or illegal drugs;
  • Children who eat dinner with their families nightly are 20 percent less likely to drink, smoke, or use illegal drugs;
  • Teens who share frequent family dinners are less likely to have sex at young ages, participate in fights, or be suspended from school;
  • Teens who eat dinner with their families are at lower risk for thoughts of suicide;
  • Children who eat with their families are more likely to eat healthier foods and more balanced meals; and
  • Family dining improves communication and family connections.
So even though my blog is not about statistics, it is astounding that the table is more than just important. But, the dining room table doesn't have to be expensive to achieve the above results.

Our furniture is an expression of our family. There is so many different types of looks and decor and for each family it is different. I want to share with you a table that I found at the local thrift store and refurbished for my daughter. It just goes to show you, a lot of cash doesn't have to be spent to get the look that your family desires.

I will never understand why anyone would give up a solid wood piece of furniture. Yes, its definitely seen better days, but there is a beautiful surface under those years of abuse. So I guess I am thankful to those who don't choose to redo their wood treasures, or I wouldn't have anything to blog about. 


I basically started with alot of sanding. The tabletop did not take too long and the legs thankfully had not much lacquer still remaining. Even so, I took  a shortcut to sanding and spray painted the legs with basic white spray paint. The spray paint seems to stick easier to the lacquer and  the latex paint adheres to the spray paint very well.


The chairs were leftover from my next door neighbor's yard sale. She had them stored in the garage for years. They are solid early 1950's chairs that like the table, were stored and just forgotten about. 


As sometimes I do when I am so into a project I did not take pictures of every step. But here is one I took only minutes after sanding the tabletop. Within a few minutes you begin to see the raw wood that is just waiting to come out.

After much deliberation with a another daughter, who always helps me out on paint choices. We searched the internet for the right color's and decided on a nice "green distressed" farm table with black accent to set it off. We then added a provincial stain to keep it authentic to a Farm Style Table.


We then painted the chairs with the same black accent. This allowed the dark maple color on the back of the chairs to stay their original color and give them a nice contrast with the table.  

All in all, this was a  a large project that I enjoyed seeing the final result. It's also very satisfying knowing that while my daughter and her family sit at their custom made table that I had a hand in, they can share their day as they come together and I can somehow be part of that. 

  • Thrift Store Table                     $11.00
  • Spray Paint (dollar store)            $1.00
  • Project Paint (on hand)                  .00
  • 4 Chairs (leftover yardsale)            .00

--------------------------------------------------------------------------------------------

  • TOTAL OF TODAY’S PROJECT     $12.00

Wednesday, October 9, 2013

Queen Size Headboard Turned Into A Coat Rack

Yesterday while shopping at the thrift store with my daughter we came across this wonderful Queen headboard. I loved the color as well as the style. I knew that with railings gone that most people would just pass it by, but still I took no chances and snatched it up. I had no idea what I was going to do with it, but how could I pass it up for .09 cents.


When we got it home, I started digging through my covenanted boxes of old hardware and then I knew...Coat Rack.

I started out by taking off the legs first. Next I distressed it with a hand sander, then added hardware. Last step I took some antiquing paint and brushed it over the areas I had distressed.

Not too bad for a hour's work for the finished product. A new coat rack for about .25 cents.


  • Paint (onhand)                        $.00
  • Headboard from thrift store      $.09
  • Hardware (3 x $1.00 yard sale)  $3.00

--------------------------------------------------------------------------------------

  • TOTAL OF TODAY’S PROJECT    $3.09 


Monday, October 7, 2013

Vintage Lamp Takes a Trip from Drab to Worldly

I love going to the Thrift Store. There is nothing else that gets my more excited. Finding that one "peculiur piece that needed a makeover. Then as I was working around the house and realized I had some vintage pieces of my fiance's who needed me just as much.

Today, I came across this light. Never paid much attention to it until I was replacing the cabinet that it was sitting on with a upcycled piece I got from the thrift store. I soon realized as I was staging my new cabinet that this light had been overlooked.

The lampshade was one of the old shades that had the fabric glued onto the plastic shade. So I decided to use the existing shade and take the outer fabric piece off.


I decided that I wanted a different look for it, something that would be a focal point and began rummaging through my finds. I came across an atlas that I had gotten at the neighborhood thriftstore for .25. I knew right then that was the answer. 

After carefully cutting pictures from the atlas I neatly glued them onto the lamp shade. I couldn't be happier about the outcome.


  • Vintage Light (onhand)           $.00
  • Atlas from thrift store             $.25                

--------------------------------------------------------------------------------------

  • TOTAL OF TODAY’S PROJECT    $.25 


Saturday, October 5, 2013

TV Cart Recycled and Reloved

TV Cart Recycled and Reloved

Here is a TV cart that I bought at an auction for 4.00. Solid Wood for the most part with a ceramic top. I love to find things that need TLC! I also try to buy mismatched paint at my local HomeDepot.com, then mix the colors to make new colors. Not only does it save you money, it also allows you to be creative as well. Today I mixed blue and gray paints to add much needed updating to the color and revamped the handles with my favorite nickel color spray paint for the handles and voilà a new look.

TV Cart Transformed 


  • Paint (onhand)                        $.00
  • TV Cart                                 $3.00

--------------------------------------------------------------------------------------

  • TOTAL OF TODAY’S PROJECT    $3.00 


TV Console Turned Hutch For $10.00

TV Console Turned Hutch For $10.00

I thought I would share a find that I have upcycled lately. It was a Made in Italy by Ballard Designs Console. I picked it up at the local thrift store for 8.00. I decided that I wanted it much higher than the 2 inch ball legs that were on it. I wanted to turn it into a hutch that I could utilize more than as a TV stand.

Image 

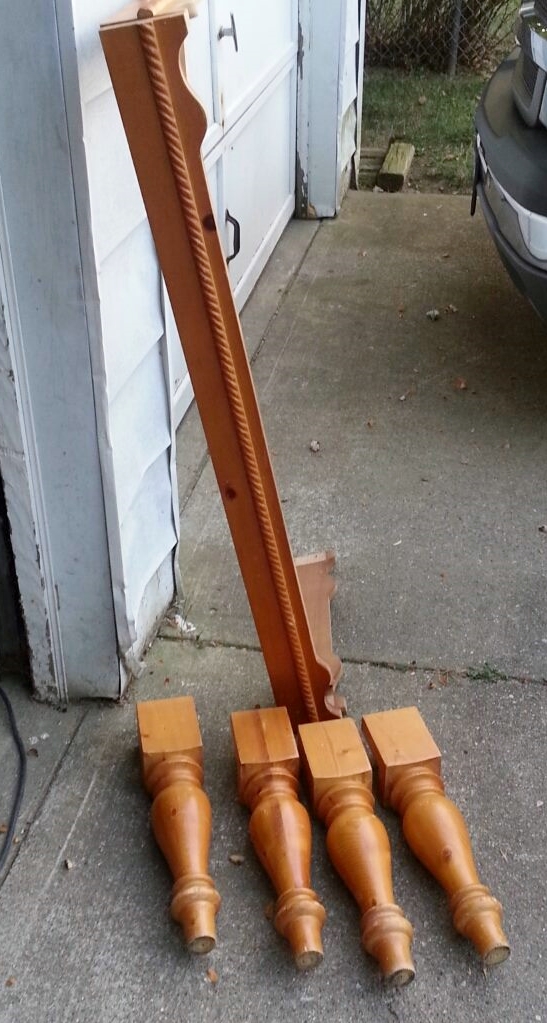
 I had a coffee table that I made the top of this bench seat from. What remained were 4 legs and the decorative edge from the coffee table.


  Image Image

Upon measuring the decorative edge from the coffee table it was almost a perfect fit.

Image 

I then applied the decorative edge, along with the legs from the leftover coffee table and it worked out better than I thought. I used the same hardware as well and screwed everything into place.

Image 
After applying all of my pieces, I repainted it and gave it a shabby look. I can't believe I found a console made in Italy by Ballard Designs that normally sells for $600.00. I paid 8.00 for the console and the left over pieces of a $2.00 coffee table.

.

  • Thrift Store Console by Ballard Designs   8.00
  • Paint from previous projects                     free
  • Wood legs and decorative wood              2.00

--------------------------------------

  •  TOTAL OF TODAY’S PROJECT     $10.00
Upcycled Ballard Designs Console


Monday, September 30, 2013

The Top 5 Ways to Decorate Your Home on a Budget

If you have just brought your first house, or you are moving away from home, and the thought of furnishing and decorating is stressing you out, take a look at our list below of ways you can decorate your home on a budget.


Cheap as Free
The best way to decorate on a budget is not to spend any money at all. There are a number of ways you can get furniture for free. Firstly, signup to a website like freecycle, where people offer items they no longer want, rather than selling them on or throwing them away. If there is something in particular you need, it may be worth putting the word out to your friends and family. You never know who has an unused coffee table in their garage or attic. With free furniture, you don’t have much of a choice about style or colour. Try modifying what you get by painting, sanding, reupholstering or accessorising.

Second Hand
If you want to have more of a choice over what you buy, and if you are a fan of vintage styles and antique furniture, buy second hand. There are so many ways to do this. You could go to car boot sales, second hand furniture shops, charity shops or take a trip to your local auction house. Auction houses are great places to pick up bargains, whether it’s a house clearance, or a antique chairs that no-one wants, you will be surprised at the variety of what you can find. If that sparks your interest, you should also consider recycling centres.

Online
If you cant find what you want for free or second hand, don’t just go to your nearest retailer and buy a piece of furniture outright, go online and check out price comparison websites. Savings could be as simple as the price online being cheaper than the price in store. This is the best way of making sure you get the best price for your money, and you get to see a wider selection of furniture. As you wont be looking at the pieces in person, take measurements of your room so that you can make sure that what you order fits in your home.

DIY
Rather than paying someone to decorate, do it yourself. You can hire wallpaper strippers that can effectively remove all types of wallpaper, vinyl and woodchip. If you have moved into an older building, you may find that the previous owners have put wallpaper over existing wallpaper, sometimes multiple times. A wallpaper stripper will leave you with a clean surface for redecoration. Whether you are painting or papering, if you are unsure of how to do something, get advice online, or from home improvement retailers such as B&Q. You will be left with a real sense of achievement once you have finished.

Craft and Upcycle
You can use craft and upcycling to make your home interior unique, from making your own accessories and ornaments, to modifying and making your own furniture. Reclaimed materials are great when undergoing a DIY project. You may find broken antiques that you can restore or repurpose. This is a great way to reflect your individuality within your new home.


We hope that these suggestions have inspired you to start bargain hunting and DIY decorating.

Guest Blogger Emma Richards is a keen crafter, upcycler and second hand enthusiast working at Lilleymans.

Sunday, September 29, 2013

Upcycled Plant Hanger From Recycled Finds

It's Sunday and I like to take it a little easier so I opted for a simpler project. We have been remodeling our house with only thrift store decor and I noticed that I had a plant hanger that still needed a nice hanging plant. I went through the shed that holds all my precious junk and decided I would see what I could find.

So Today's Project at J4H is a Upcycled Plant Hanger. First I found a wire basket and some old silver. I have a addiction for picking up simple things that would work for other projects.


For this project you will need the following: 

  • old chain 
  • drill
  • hammer 
  • needle nose pliers 
  • parts for your hanging basket 


recycled silver spoons


First you need to hammer your silver to a flat shape. After hammering each bowl of the spoon you will then need to drill holes on each end of the spoon. After you have all of the holes drilled take the chain links and insert them into your basket and then your spoon on each side of the basket. Always making sure that your spoon is faced forward before closing the link.


After getting the first 3 done, I then did the same on the other 3 smaller spoons. You can use any size spoon to your taste. After attaching all 6 spoons you will need to gather them all together at the top. Still making sure all of your spoons are facing forward.


After doing this take a long link of chain and attach it to the top of the spoons. This is where you can be creative and let your imagination take over. I used crystal glass that I took from an old table lamp and also a decorative metal piece from another old hanging lamp. You then need to feed your chain through the items you use and make a circle with the chain to hold it on the plant hook.  


Afterwards you have a plant hanger that is an expression of your creativity as well as recycling things that normally would have been discarded for the fraction of the cost.


Bag of Silver bought at a garage sale       2.00
Pieces from lamps already on hand          0.00
------------------------------------------------------------
Total of today’s Project                        2.99


#repurposedonpurpose


Ugly Betty Gets A Makeover


More and more people are interested in recycling. The fact that they can help the environment and improve their life at the same time makes them become more engaged and attracted to all kinds of projects that refer to this problem. Starting today I want to engage others into looking at things in a different perspective. I am talking to you “Do it yourselfers” a.k.a “DIY“, or even those who think they couldn't draw a circle. Get in touch with your inner creativity, you may just be surprised.

As I begin this first blog for the long haul, I might as well come clean from the start. As one of my best friends always said "I'm driving Miss Crazy" when I rode in the car with him. In a way he was right.

They say the key is to first; admit you have a problem...I have several. I love thrift stores, flea markets as well as the good ole garage sale. But what I love even more is the items that I find (the stranger the better) that cross my path. I look at those unforgotten keepsakes and hand me downs as "still alive and doing well". Where most might say, "that's just junk". The object here is to see things as they once were and even more times, as what they can become. Hopefully you will find yourself laughing sometimes at my "inner" child and my passion of changing one piece of junk at a time. I also hope that you can find some ideas to use yourself as I begin this blog about my passion...upcycling.

As I am no writer, just a talker (ask anyone). I am going to try to let my fingers type my words as you go along with me through my daily life. If you got this far....I thank you for reading.

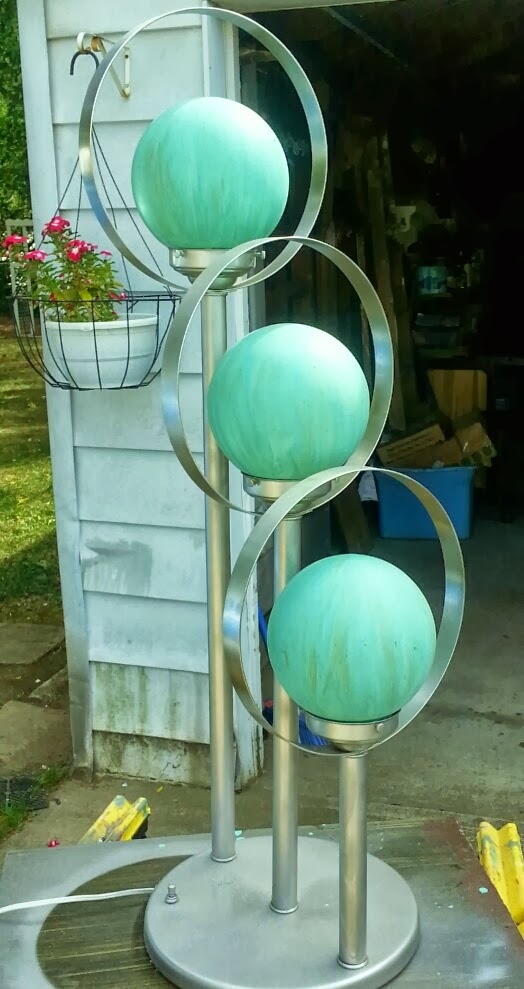
Today's #repurposedonpurpose is a wonderful light Marked Made in Mexico that I found that was screaming Ugly Betty. But, I like the underdog and swept it off the shelf. Not to mention it was only $3.99.

I brought it home and I dug out all my paint. I knew that the brass color had to go.and I wanted to make this lamp more “current” and decided on nickel color. Even though I have a good stash of junk, I didn’t have what I really wanted and that was world globes. I really wanted to make the light bulbs into globes or planet looking lights. But, that will have to be for another day. Instead I took what I did have on hand and decided to paint the globes instead. `

Despite having to use my second choice, I was very pleased with the outcome. I was even more elated when I found out that my light was actually a 3-way light as well. Each globe comes on one at a time and then all 3 come on if you want more light.


Light                          3.99
Paint already on hand 0.00
----------------------------------------------
Total of today’s Project 3.99


Junkin4Humanity.com  #J4H